Get the Perfect Fit: Your Guide to Cutting LED Strip Lights
Cutting LED strip lights is often necessary for DIY projects to ensure they fit the specific dimensions or layout of a space. Since LED strips are typically sold in long reels, cutting them allows for precise installation, such as around corners, in tight spaces, or on custom fixtures, without waste or excess material.
If you’ve worked with LED strips before, then you know how easy it is to cut them to a desired length. And if you’re new to working with LED strip lights, get your sharpest scissors out of the drawer because that’s precisely what we’ll teach you below: how to cut LED strip lights safely and accurately for your DIY projects.
Safety tip #1: Never cut an LED strip light while it’s plugged in.
Know Your Strips: Identifying Key Features for Cutting
The key to cutting an LED strip light accurately is knowing where to cut. There are two things you need to look out for to determine where you can trim your strip. This will vary from one manufacturer to another, but there are usually two indicators you can check.
Cutting Marks
Usually, an LED strip light will have designated cutting marks indicated by a scissor symbol or running lines across the copper pads. Cutting along these lines or symbols will keep the circuits and LED components intact and working. So, you must never cut other parts of the strip that don’t have these lines and symbols.
Copper Pads/Contacts
These are small, exposed metals that act as points for electrical connections. Cutting marks go through them, allowing you to cut and reconnect the strip lights as needed for your DIY project. The copper pads are the points where you can solder wires or attach solderless connectors after cutting. So, ensure that you cut directly through the middle of these pads. Making the wrong cuts has the potential to compromise the strip’s circuitry.
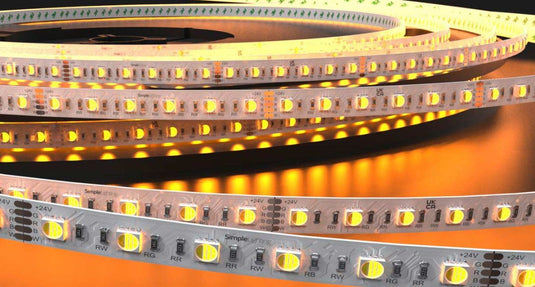
Type of LED Strip
Not all LED strips are made the same. Single colour, RGB, and COB are some of the most common types of LED strip lights. Although the cutting of each kind is generally the same, the number of copper pads will vary since the RGB is a 4-pin strip, while the single colour and COB are 2-pin strips. So, the type of LED strip does not affect the cutting process. The only evident difference is the width of the strips.
Your DIY Toolkit: What You'll Need to Cut LED Strips Safely
We’re all about safety first, precision second. Here are the essential items you’ll need to ensure safe LED strip cutting.
Sharp Scissors or Utility Knife
A dull blade has the tendency to tear the LED strip rather than cut it. What you need is a pair of scissors or a utility knife with a sharp point or edge. These should allow you to make clean and precise cuts while preserving the strip’s integrity.
Ruler or Straight Edge
You unlikely need to use this, but in the unfortunate case that you’re not sure if you can cut the strips in a straight line, you’ll find that having a guide can help you make a clean cut easily.
Cutting Mat or Protective Surface
When using a utility knife, if you’re not mindful, you can unexpectedly leave scratches on your working station, which, let’s all be honest, you don’t want that. For projects that involve sharp tools, prepare a cutting mat or other protective surface before you begin working.
DIY Cutting Process: Get Your LED Strips to the Perfect Length
You’ve got your cutting tools ready, and you’ve prepped your work area. It’s time to get to work.

Step 1: Measure Your Required Length
Hold your horses! Before you start cutting your LED strip lights, you have to determine where you need to cut. Get a measuring tape and determine the exact length of the LED strip light you need for your project. Mark it with a pencil or a marker.

Step 2: Identify the Correct Cutting Line
Carefully locate the closest cutting point (look for the scissor icon or solid line running through the copper pads) that aligns with your measurement. Make sure you’re cutting at the correct point in the strip.

Step 3: Prepare Your Cutting Tool and Surface
Place the LED strip on your cutting mat or protective surface. Ensure your scissors or utility knife is sharp and ready.

Step 4: Make the Cut
This is it! Align your ruler or straight edge along the cutting mark. Using a firm, even pressure, cut directly through the LED strip at the designated line. Ensure you cut through the middle of the copper pads.

Step 5: Check Your Cut
Inspect the cut edge to ensure it is clean and straight, and that the copper pads are exposed and undamaged. Damaged copper pads might mean you need a sharper tool.
DIY Cutting Tips: Ensuring Success and Avoiding Mistakes
Tip 1: Always Cut on the Designated Lines
We’ll keep repeating this because it's the most important thing to remember when cutting LED strip lights. Cutting anywhere else will damage the circuit and the LED components, causing the strip to malfunction or not function at all.
Tip 2: Cut Straight
Do this for your peace of mind. A straight cut ensures proper contact when using solderless connectors or soldering wires. The straighter the cut, the more seamless the connections will be. Stick to the lines!
Tip 3: Handle with Care
LED strip lights are flexible, but they’re not indestructible. Avoid bending or twisting the LED strip excessively while cutting it. Poor handling can cause problems with your LED strips.
Tip 4: Plan Your Cuts
The first step to a clean and seamless LED strip light installation is planning well. Think about how you will connect the cut sections before you make the cuts, especially around corners.
Tip 5: Test After Cutting:
Do this before the final installation. Once you've made your cuts and any necessary connections, briefly test the LED strip to ensure all sections are working correctly. Only then should you mount them permanently or semi-permanently using strong adhesives or mounting clips.

What to Do After Cutting: Connecting Your LED Strips
Now that the easy part is done (how to cut LED tape into segments), you can proceed to the next challenge: connecting the strips. Check out this article where we discuss soldering, solderless connectors, and How to Install LED Strip Lights Around Corners and Uneven Surfaces.
DIY Safety First: Remember These Points When Cutting LED Strips
-
Always disconnect the power supply from the LED strip before cutting.
-
Use sharp tools carefully.
-
Avoid cutting near any live electrical wires, especially if the strip is already partially installed.
Ready to Cut Your LED Strip Lights to Size for Your DIY Project?
LED Supplier offers a wide selection of high-quality LED strip lights that are perfect for your next DIY lighting project. Choose from single colour strips, RGB or RGBW, and COB LED strips. And if you’re planning to install in the kitchen or bathroom, we have strips with a high IP rating. All your LED strip light needs and more await. So, check out LED Supplier today to avoid missing out!
Perfectly Sized Lighting: Mastering the Art of Cutting LED Strip Lights for Your Home
It’s not hard to master the art of cutting your LED strip lights, especially once you take these good practices to heart. Just make sure you know the features of your LED strip light, you have the proper tools for cutting, and you know what mistakes to avoid when cutting.
Have fun cutting!